About storage drivers
Estimated reading time: 14 minutes
To use storage drivers effectively, it’s important to know how Docker builds and stores images, and how these images are used by containers. You can use this information to make informed choices about the best way to persist data from your applications and avoid performance problems along the way.
Storage drivers allow you to create data in the writable layer of your container. The files won’t be persisted after the container is deleted, and both read and write speeds are lower than native file system performance.
Note: Operations that are known to be problematic include write-intensive database storage, particularly when pre-existing data exists in the read-only layer. More details are provided in this document.
Learn how to use volumes to persist data and improve performance.
Images and layers
A Docker image is built up from a series of layers. Each layer represents an instruction in the image’s Dockerfile. Each layer except the very last one is read-only. Consider the following Dockerfile:
FROM ubuntu:18.04
COPY . /app
RUN make /app
CMD python /app/app.py
This Dockerfile contains four commands, each of which creates a layer. The
FROM statement starts out by creating a layer from the ubuntu:18.04 image.
The COPY command adds some files from your Docker client’s current directory.
The RUN command builds your application using the make command. Finally,
the last layer specifies what command to run within the container.
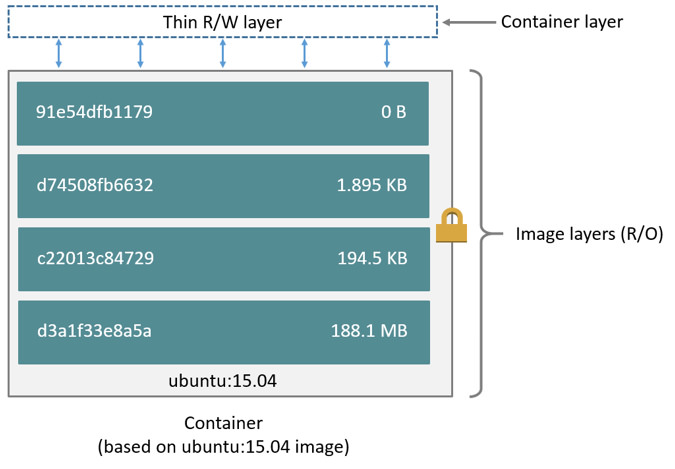
Each layer is only a set of differences from the layer before it. The layers are stacked on top of each other. When you create a new container, you add a new writable layer on top of the underlying layers. This layer is often called the “container layer”. All changes made to the running container, such as writing new files, modifying existing files, and deleting files, are written to this thin writable container layer. The diagram below shows a container based on the Ubuntu 15.04 image.
A storage driver handles the details about the way these layers interact with each other. Different storage drivers are available, which have advantages and disadvantages in different situations.
Container and layers
The major difference between a container and an image is the top writable layer. All writes to the container that add new or modify existing data are stored in this writable layer. When the container is deleted, the writable layer is also deleted. The underlying image remains unchanged.
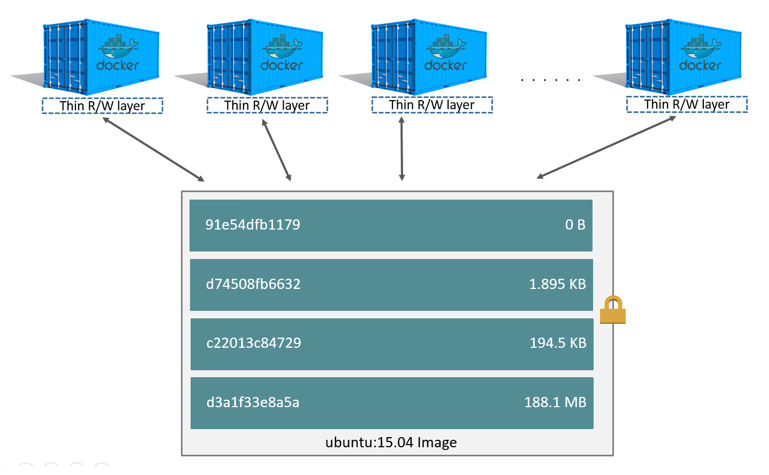
Because each container has its own writable container layer, and all changes are stored in this container layer, multiple containers can share access to the same underlying image and yet have their own data state. The diagram below shows multiple containers sharing the same Ubuntu 15.04 image.
Note: If you need multiple images to have shared access to the exact same data, store this data in a Docker volume and mount it into your containers.
Docker uses storage drivers to manage the contents of the image layers and the writable container layer. Each storage driver handles the implementation differently, but all drivers use stackable image layers and the copy-on-write (CoW) strategy.
Container size on disk
To view the approximate size of a running container, you can use the docker ps -s
command. Two different columns relate to size.
-
size: the amount of data (on disk) that is used for the writable layer of each container. -
virtual size: the amount of data used for the read-only image data used by the container plus the container’s writable layersize. Multiple containers may share some or all read-only image data. Two containers started from the same image share 100% of the read-only data, while two containers with different images which have layers in common share those common layers. Therefore, you can’t just total the virtual sizes. This over-estimates the total disk usage by a potentially non-trivial amount.
The total disk space used by all of the running containers on disk is some
combination of each container’s size and the virtual size values. If
multiple containers started from the same exact image, the total size on disk for
these containers would be SUM (size of containers) plus one image size
(virtual size- size).
This also does not count the following additional ways a container can take up disk space:
- Disk space used for log files if you use the
json-filelogging driver. This can be non-trivial if your container generates a large amount of logging data and log rotation is not configured. - Volumes and bind mounts used by the container.
- Disk space used for the container’s configuration files, which are typically small.
- Memory written to disk (if swapping is enabled).
- Checkpoints, if you’re using the experimental checkpoint/restore feature.
The copy-on-write (CoW) strategy
Copy-on-write is a strategy of sharing and copying files for maximum efficiency. If a file or directory exists in a lower layer within the image, and another layer (including the writable layer) needs read access to it, it just uses the existing file. The first time another layer needs to modify the file (when building the image or running the container), the file is copied into that layer and modified. This minimizes I/O and the size of each of the subsequent layers. These advantages are explained in more depth below.
Sharing promotes smaller images
When you use docker pull to pull down an image from a repository, or when you
create a container from an image that does not yet exist locally, each layer is
pulled down separately, and stored in Docker’s local storage area, which is
usually /var/lib/docker/ on Linux hosts. You can see these layers being pulled
in this example:
$ docker pull ubuntu:18.04
18.04: Pulling from library/ubuntu
f476d66f5408: Pull complete
8882c27f669e: Pull complete
d9af21273955: Pull complete
f5029279ec12: Pull complete
Digest: sha256:ab6cb8de3ad7bb33e2534677f865008535427390b117d7939193f8d1a6613e34
Status: Downloaded newer image for ubuntu:18.04
Each of these layers is stored in its own directory inside the Docker host’s
local storage area. To examine the layers on the filesystem, list the contents
of /var/lib/docker/<storage-driver>. This example uses the overlay2
storage driver:
$ ls /var/lib/docker/overlay2
16802227a96c24dcbeab5b37821e2b67a9f921749cd9a2e386d5a6d5bc6fc6d3
377d73dbb466e0bc7c9ee23166771b35ebdbe02ef17753d79fd3571d4ce659d7
3f02d96212b03e3383160d31d7c6aeca750d2d8a1879965b89fe8146594c453d
ec1ec45792908e90484f7e629330666e7eee599f08729c93890a7205a6ba35f5
l
The directory names do not correspond to the layer IDs (this has been true since Docker 1.10).
Now imagine that you have two different Dockerfiles. You use the first one to
create an image called acme/my-base-image:1.0.
FROM ubuntu:18.04
COPY . /app
The second one is based on acme/my-base-image:1.0, but has some additional
layers:
FROM acme/my-base-image:1.0
CMD /app/hello.sh
The second image contains all the layers from the first image, plus a new layer
with the CMD instruction, and a read-write container layer. Docker already
has all the layers from the first image, so it does not need to pull them again.
The two images share any layers they have in common.
If you build images from the two Dockerfiles, you can use docker image ls and
docker history commands to verify that the cryptographic IDs of the shared
layers are the same.
-
Make a new directory
cow-test/and change into it. -
Within
cow-test/, create a new file calledhello.shwith the following contents:#!/bin/sh echo "Hello world"Save the file, and make it executable:
chmod +x hello.sh -
Copy the contents of the first Dockerfile above into a new file called
Dockerfile.base. -
Copy the contents of the second Dockerfile above into a new file called
Dockerfile. -
Within the
cow-test/directory, build the first image. Don’t forget to include the final.in the command. That sets thePATH, which tells Docker where to look for any files that need to be added to the image.$ docker build -t acme/my-base-image:1.0 -f Dockerfile.base . Sending build context to Docker daemon 812.4MB Step 1/2 : FROM ubuntu:18.04 ---> d131e0fa2585 Step 2/2 : COPY . /app ---> Using cache ---> bd09118bcef6 Successfully built bd09118bcef6 Successfully tagged acme/my-base-image:1.0 -
Build the second image.
$ docker build -t acme/my-final-image:1.0 -f Dockerfile . Sending build context to Docker daemon 4.096kB Step 1/2 : FROM acme/my-base-image:1.0 ---> bd09118bcef6 Step 2/2 : CMD /app/hello.sh ---> Running in a07b694759ba ---> dbf995fc07ff Removing intermediate container a07b694759ba Successfully built dbf995fc07ff Successfully tagged acme/my-final-image:1.0 -
Check out the sizes of the images:
$ docker image ls REPOSITORY TAG IMAGE ID CREATED SIZE acme/my-final-image 1.0 dbf995fc07ff 58 seconds ago 103MB acme/my-base-image 1.0 bd09118bcef6 3 minutes ago 103MB -
Check out the layers that comprise each image:
$ docker history bd09118bcef6
IMAGE               CREATED             CREATED BY                                      SIZE                COMMENT
bd09118bcef6        4 minutes ago       /bin/sh -c #(nop) COPY dir:35a7eb158c1504e...   100B
d131e0fa2585        3 months ago        /bin/sh -c #(nop)  CMD ["/bin/bash"]            0B
<missing>           3 months ago        /bin/sh -c mkdir -p /run/systemd && echo '...   7B
<missing>           3 months ago        /bin/sh -c sed -i 's/^#\s*\(deb.*universe\...   2.78kB
<missing>           3 months ago        /bin/sh -c rm -rf /var/lib/apt/lists/*          0B
<missing>           3 months ago        /bin/sh -c set -xe   && echo '#!/bin/sh' >...   745B
<missing>           3 months ago        /bin/sh -c #(nop) ADD file:eef57983bd66e3a...   103MB
$ docker history dbf995fc07ff IMAGE CREATED CREATED BY SIZE COMMENT dbf995fc07ff 3 minutes ago /bin/sh -c #(nop) CMD ["/bin/sh" "-c" "/a... 0B bd09118bcef6 5 minutes ago /bin/sh -c #(nop) COPY dir:35a7eb158c1504e... 100B d131e0fa2585 3 months ago /bin/sh -c #(nop) CMD ["/bin/bash"] 0B <missing> 3 months ago /bin/sh -c mkdir -p /run/systemd && echo '... 7B <missing> 3 months ago /bin/sh -c sed -i 's/^#\s*\(deb.*universe\... 2.78kB <missing> 3 months ago /bin/sh -c rm -rf /var/lib/apt/lists/* 0B <missing> 3 months ago /bin/sh -c set -xe && echo '#!/bin/sh' >... 745B <missing> 3 months ago /bin/sh -c #(nop) ADD file:eef57983bd66e3a... 103MBNotice that all the layers are identical except the top layer of the second image. All the other layers are shared between the two images, and are only stored once in
/var/lib/docker/. The new layer actually doesn’t take any room at all, because it is not changing any files, but only running a command.Note: The
<missing>lines in thedocker historyoutput indicate that those layers were built on another system and are not available locally. This can be ignored.
Copying makes containers efficient
When you start a container, a thin writable container layer is added on top of the other layers. Any changes the container makes to the filesystem are stored here. Any files the container does not change do not get copied to this writable layer. This means that the writable layer is as small as possible.
When an existing file in a container is modified, the storage driver performs a
copy-on-write operation. The specifics steps involved depend on the specific
storage driver. For the aufs, overlay, and overlay2 drivers, the
copy-on-write operation follows this rough sequence:
-
Search through the image layers for the file to update. The process starts at the newest layer and works down to the base layer one layer at a time. When results are found, they are added to a cache to speed future operations.
-
Perform a
copy_upoperation on the first copy of the file that is found, to copy the file to the container’s writable layer. -
Any modifications are made to this copy of the file, and the container cannot see the read-only copy of the file that exists in the lower layer.
Btrfs, ZFS, and other drivers handle the copy-on-write differently. You can read more about the methods of these drivers later in their detailed descriptions.
Containers that write a lot of data consume more space than containers that do not. This is because most write operations consume new space in the container’s thin writable top layer.
Note: for write-heavy applications, you should not store the data in the container. Instead, use Docker volumes, which are independent of the running container and are designed to be efficient for I/O. In addition, volumes can be shared among containers and do not increase the size of your container’s writable layer.
A copy_up operation can incur a noticeable performance overhead. This overhead
is different depending on which storage driver is in use. Large files,
lots of layers, and deep directory trees can make the impact more noticeable.
This is mitigated by the fact that each copy_up operation only occurs the first
time a given file is modified.
To verify the way that copy-on-write works, the following procedures spins up 5
containers based on the acme/my-final-image:1.0 image we built earlier and
examines how much room they take up.
Note: This procedure doesn’t work on Docker Desktop for Mac or Docker Desktop for Windows.
-
From a terminal on your Docker host, run the following
docker runcommands. The strings at the end are the IDs of each container.$ docker run -dit --name my_container_1 acme/my-final-image:1.0 bash \ && docker run -dit --name my_container_2 acme/my-final-image:1.0 bash \ && docker run -dit --name my_container_3 acme/my-final-image:1.0 bash \ && docker run -dit --name my_container_4 acme/my-final-image:1.0 bash \ && docker run -dit --name my_container_5 acme/my-final-image:1.0 bash c36785c423ec7e0422b2af7364a7ba4da6146cbba7981a0951fcc3fa0430c409 dcad7101795e4206e637d9358a818e5c32e13b349e62b00bf05cd5a4343ea513 1e7264576d78a3134fbaf7829bc24b1d96017cf2bc046b7cd8b08b5775c33d0c 38fa94212a419a082e6a6b87a8e2ec4a44dd327d7069b85892a707e3fc818544 1a174fc216cccf18ec7d4fe14e008e30130b11ede0f0f94a87982e310cf2e765 -
Run the
docker pscommand to verify the 5 containers are running.CONTAINER ID IMAGE COMMAND CREATED STATUS PORTS NAMES 1a174fc216cc acme/my-final-image:1.0 "bash" About a minute ago Up About a minute my_container_5 38fa94212a41 acme/my-final-image:1.0 "bash" About a minute ago Up About a minute my_container_4 1e7264576d78 acme/my-final-image:1.0 "bash" About a minute ago Up About a minute my_container_3 dcad7101795e acme/my-final-image:1.0 "bash" About a minute ago Up About a minute my_container_2 c36785c423ec acme/my-final-image:1.0 "bash" About a minute ago Up About a minute my_container_1 -
List the contents of the local storage area.
$ sudo ls /var/lib/docker/containers 1a174fc216cccf18ec7d4fe14e008e30130b11ede0f0f94a87982e310cf2e765 1e7264576d78a3134fbaf7829bc24b1d96017cf2bc046b7cd8b08b5775c33d0c 38fa94212a419a082e6a6b87a8e2ec4a44dd327d7069b85892a707e3fc818544 c36785c423ec7e0422b2af7364a7ba4da6146cbba7981a0951fcc3fa0430c409 dcad7101795e4206e637d9358a818e5c32e13b349e62b00bf05cd5a4343ea513 -
Now check out their sizes:
$ sudo du -sh /var/lib/docker/containers/*

32K  /var/lib/docker/containers/1a174fc216cccf18ec7d4fe14e008e30130b11ede0f0f94a87982e310cf2e765
32K  /var/lib/docker/containers/1e7264576d78a3134fbaf7829bc24b1d96017cf2bc046b7cd8b08b5775c33d0c
32K  /var/lib/docker/containers/38fa94212a419a082e6a6b87a8e2ec4a44dd327d7069b85892a707e3fc818544
32K  /var/lib/docker/containers/c36785c423ec7e0422b2af7364a7ba4da6146cbba7981a0951fcc3fa0430c409
32K  /var/lib/docker/containers/dcad7101795e4206e637d9358a818e5c32e13b349e62b00bf05cd5a4343ea513
Each of these containers only takes up 32k of space on the filesystem.
Not only does copy-on-write save space, but it also reduces start-up time. When you start a container (or multiple containers from the same image), Docker only needs to create the thin writable container layer.
If Docker had to make an entire copy of the underlying image stack each time it started a new container, container start times and disk space used would be significantly increased. This would be similar to the way that virtual machines work, with one or more virtual disks per virtual machine.