Logs and troubleshooting
Estimated reading time: 16 minutes
Did you know that Docker Desktop now offers support for developers subscribed to a Pro or a Team plan? Click here to learn more.
This page contains information on how to diagnose and troubleshoot Docker Desktop issues, request Docker Desktop support (Pro and Team plan users only), send logs and communicate with the Docker Desktop team, use our forums and Success Center, browse and log issues on GitHub, and find workarounds for known problems.
Troubleshoot
Choose  > Troubleshoot
from the menu bar to see the troubleshoot options.
> Troubleshoot
from the menu bar to see the troubleshoot options.
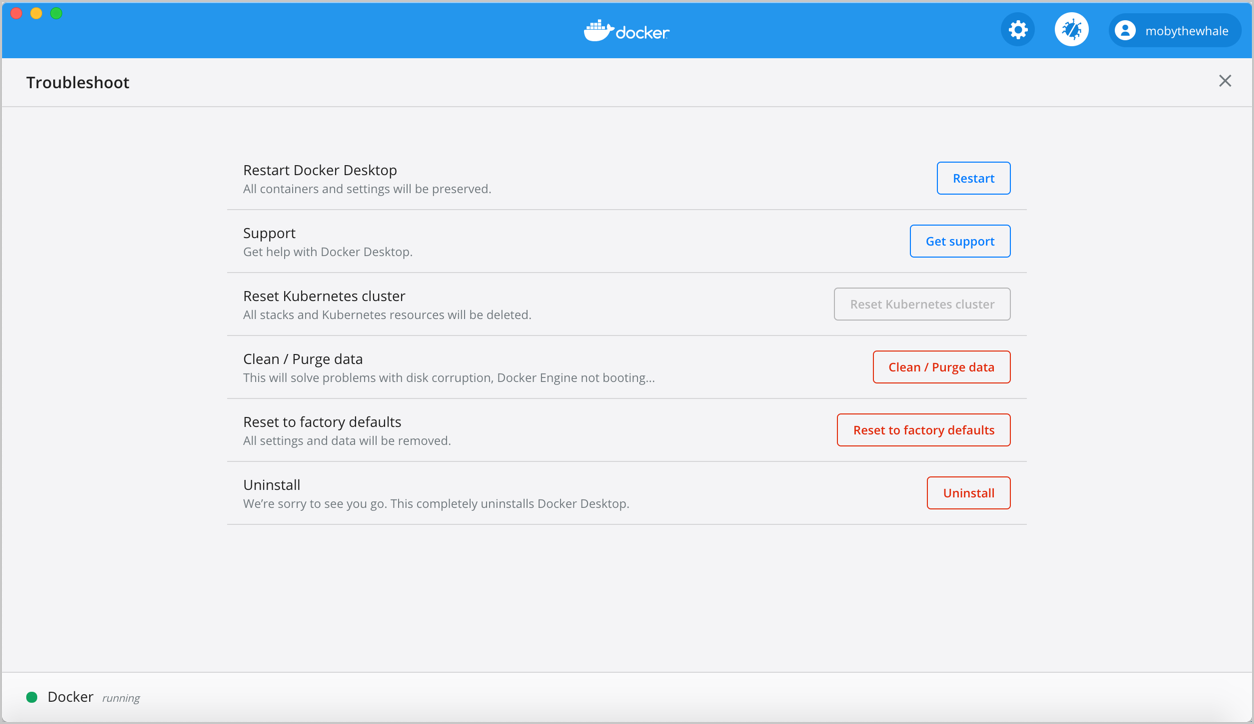
The Troubleshoot page contains the following options:
-
Restart Docker Desktop: Select to restart Docker Desktop.
-
Support: Developers on Pro and Team plans can use this option to send a support request. Other users can use this option to diagnose any issues in Docker Desktop. For more information, see Diagnose and feedback and Support.
-
Reset Kubernetes cluster: Select this option to delete all stacks and Kubernetes resources. For more information, see Kubernetes.
-
Clean / Purge data: Select this option to delete container and image data. Choose whether you’d like to delete data from Hyper-V, WSL 2, or Windows Containers and then click Delete to confirm.
-
Reset to factory defaults: Choose this option to reset all options on Docker Desktop to their initial state, the same as when Docker Desktop was first installed.
Diagnose and feedback
In-app diagnostics
If you experience issues for which you do not find solutions in this documentation, on Docker Desktop for Windows issues on GitHub, or the Docker Desktop for Windows forum, we can help you troubleshoot the log data. Before reporting an issue, we recommend that you read the information provided on this page to fix some common known issues.
- Choose > Troubleshoot
from the menu.
- Sign into Docker Desktop. In addition, ensure you are signed into your Docker account.
-
Click Get Support. This opens the in-app Diagnose & Support (Diagnose & Feedback for free users) page and starts collecting the diagnostics.
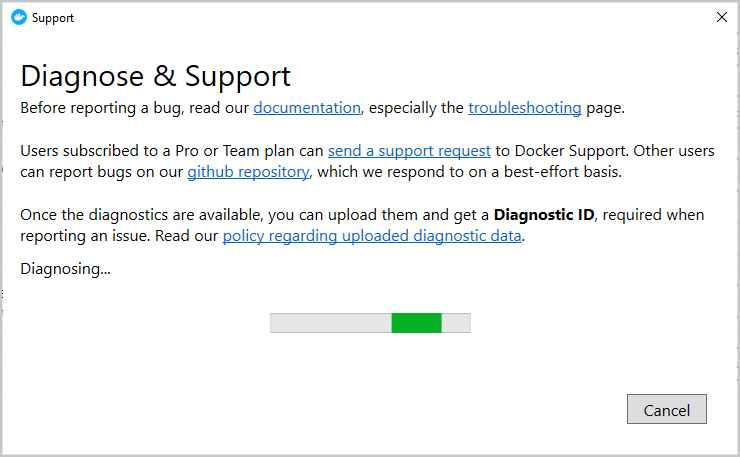
- When the diagnostics collection process is complete, click Upload to upload your diagnostics to Docker Desktop.
- When the diagnostics have been uploaded, Docker Desktop prints a Diagnostic ID. Copy this ID.
-
If you have subscribed to a Pro or a Team plan, click Get support. This opens the Docker Desktop support form. Fill in the information required and add the ID you copied earlier to the Diagnostics ID field. Click Submit to request Docker Desktop support.
Note
You must be signed in to Docker Desktop using your Pro or Team plan credentials to access the support form. For information on what’s covered as part of Docker Desktop support, see Support.
-
If you are not subscribed to a Pro or a team plan, you can click Upgrade your account to upgrade your existing account.
Alternatively, click Report an issue to open a new Docker Desktop issue on GitHub. This opens Docker Desktop for Windows on GitHub in your web browser in a ‘New issue’ template. Complete the information required and ensure you add the diagnostic ID you copied earlier. Click submit new issue to create a new issue.
Diagnosing from the terminal
On occasions it is useful to run the diagnostics yourself, for instance if Docker Desktop for Windows cannot start.
First locate the com.docker.diagnose, that should be in C:\Program
Files\Docker\Docker\resources\com.docker.diagnose.exe.
To create and upload diagnostics in Powershell, run:
PS C:\> & "C:\Program Files\Docker\Docker\resources\com.docker.diagnose.exe" gather -upload
After the diagnostics have finished, you should have the following output, containing your diagnostic ID:
Diagnostics Bundle: C:\Users\User\AppData\Local\Temp\CD6CF862-9CBD-4007-9C2F-5FBE0572BBC2\20180720152545.zip
Diagnostics ID:     CD6CF862-9CBD-4007-9C2F-5FBE0572BBC2/20180720152545 (uploaded)
Troubleshooting topics
Make sure certificates are set up correctly
Docker Desktop ignores certificates listed under insecure registries, and
does not send client certificates to them. Commands like docker run that
attempt to pull from the registry produces error messages on the command line,
like this:
Error response from daemon: Get http://192.168.203.139:5858/v2/: malformed HTTP response "\x15\x03\x01\x00\x02\x02"
As well as on the registry. For example:
2017/06/20 18:15:30 http: TLS handshake error from 192.168.203.139:52882: tls: client didn't provide a certificate
2017/06/20 18:15:30 http: TLS handshake error from 192.168.203.139:52883: tls: first record does not look like a TLS handshake
For more about using client and server side certificates, see How do I add custom CA certificates? and How do I add client certificates? in the Getting Started topic.
Volumes
Permissions errors on data directories for shared volumes
When sharing files from Windows, Docker Desktop sets permissions on shared volumes
to a default value of 0777
(read, write, execute permissions for user and for group).
The default permissions on shared volumes are not configurable. If you are working with applications that require permissions different from the shared volume defaults at container runtime, you need to either use non-host-mounted volumes or find a way to make the applications work with the default file permissions.
See also, Can I change permissions on shared volumes for container-specific deployment requirements? in the FAQs.
Volume mounting requires shared folders for Linux containers
If you are using mounted volumes and get runtime errors indicating an application file is not found, access is denied to a volume mount, or a service cannot start, such as when using Docker Compose, you might need to enable shared folders.
With the Hyper-V backend, mounting files from Windows requires shared folders for Linux containers. Click
and then Settings > Shared Folders and share the folder that contains the
Dockerfile and volume.
Support for symlinks
Symlinks work within and across containers. To learn more, see How do symlinks work on Windows? in the FAQs.
Avoid unexpected syntax errors, use Unix style line endings for files in containers
Any file destined to run inside a container must use Unix style \n line
endings. This includes files referenced at the command line for builds and in
RUN commands in Docker files.
Docker containers and docker build run in a Unix environment, so files in
containers must use Unix style line endings: \n, not Windows style: \r\n.
Keep this in mind when authoring files such as shell scripts using Windows
tools, where the default is likely to be Windows style line endings. These
commands ultimately get passed to Unix commands inside a Unix based container
(for example, a shell script passed to /bin/sh). If Windows style line endings
are used, docker run fails with syntax errors.
For an example of this issue and the resolution, see this issue on GitHub: Docker RUN fails to execute shell script.
Virtualization
Your machine must have the following features for Docker Desktop to function correctly.
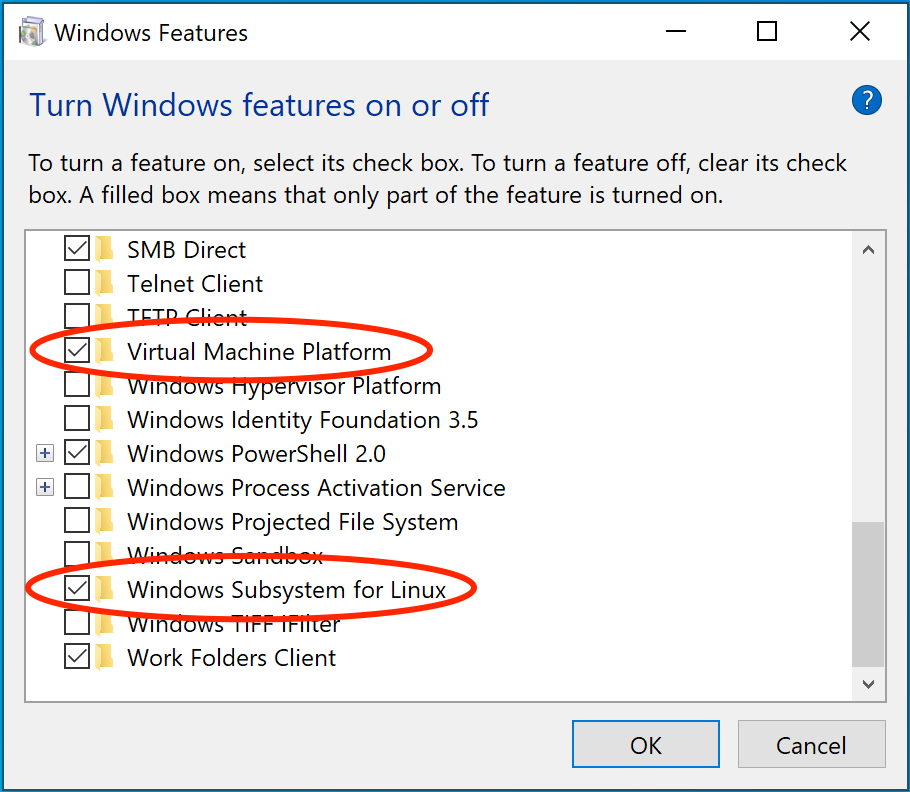
WSL 2 and Windows Home
- Virtual Machine Platform
- Windows Subsystem for Linux
- Virtualization enabled in the BIOS
- Hypervisor enabled at Windows startup
Hyper-V
On Windows 10 Pro or Enterprise, you can also use Hyper-V with the following features enabled:
- Hyper-V installed and working
- Virtualization enabled in the BIOS
- Hypervisor enabled at Windows startup
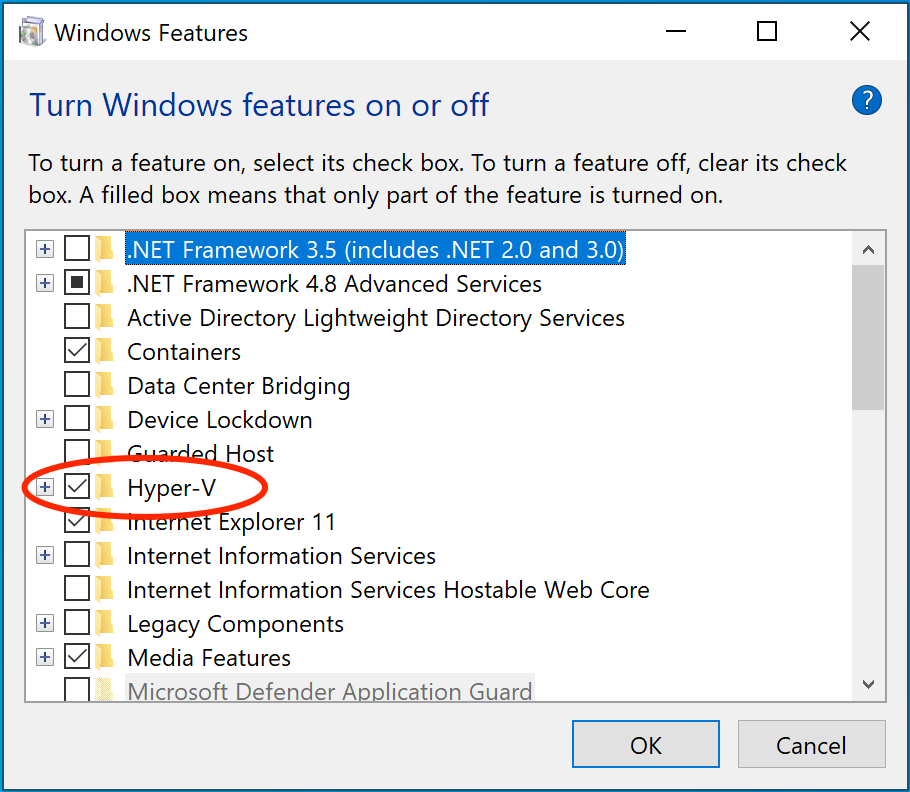
Docker Desktop requires Hyper-V as well as the Hyper-V Module for Windows Powershell to be installed and enabled. The Docker Desktop installer enables it for you.
Docker Desktop also needs two CPU hardware features to use Hyper-V: Virtualization and Second Level Address Translation (SLAT), which is also called Rapid Virtualization Indexing (RVI). On some systems, Virtualization must be enabled in the BIOS. The steps required are vendor-specific, but typically the BIOS option is called Virtualization Technology (VTx) or something similar. Run the command systeminfo to check all required Hyper-V features. See Pre-requisites for Hyper-V on Windows 10 for more details.
To install Hyper-V manually, see Install Hyper-V on Windows 10. A reboot is required after installation. If you install Hyper-V without rebooting, Docker Desktop does not work correctly.
From the start menu, type Turn Windows features on or off and press enter. In the subsequent screen, verify that Hyper-V is enabled.
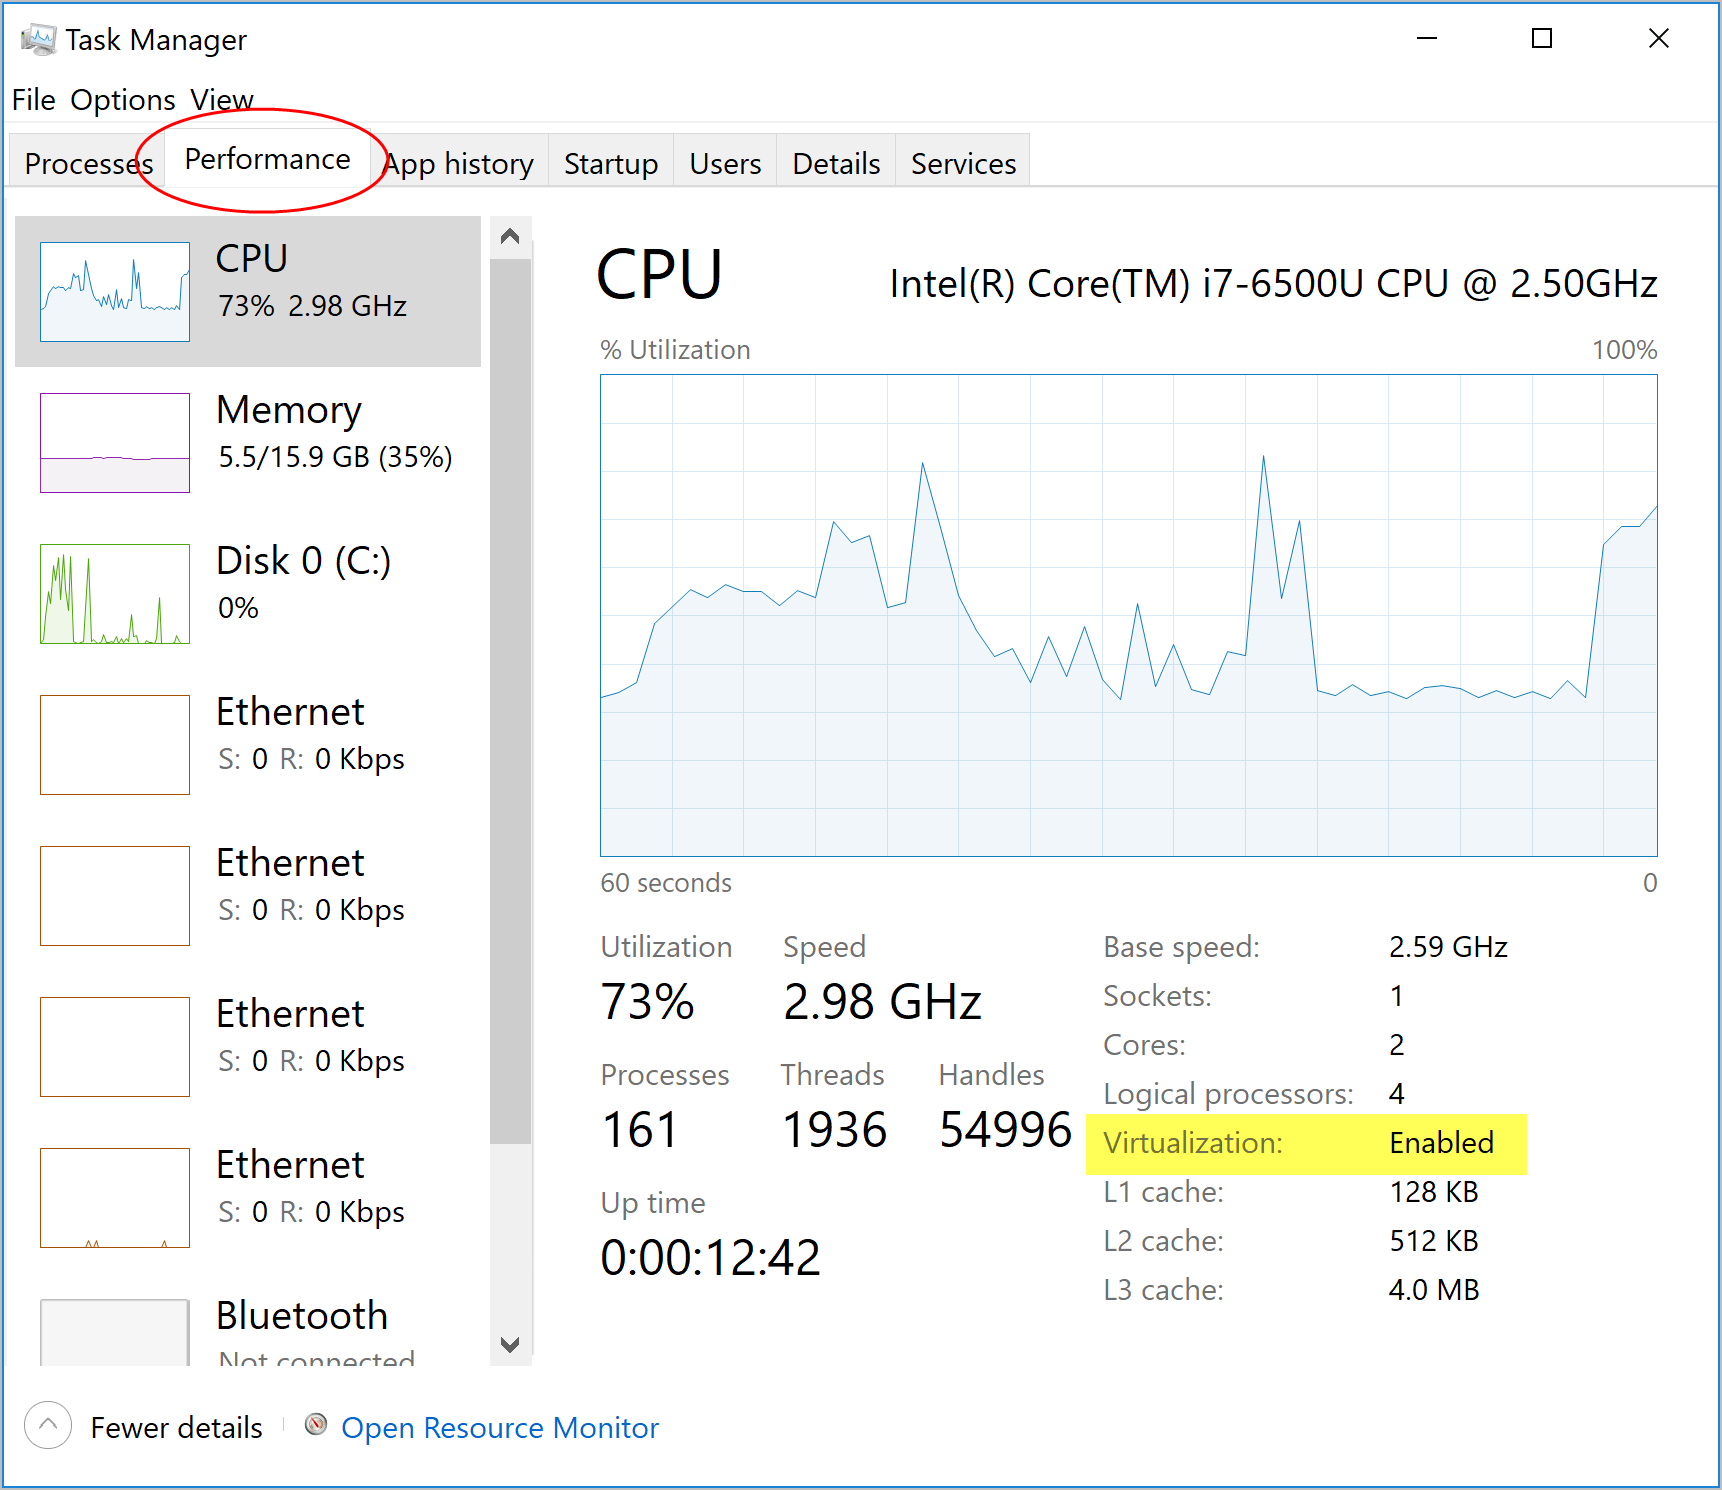
Virtualization must be enabled
In addition to Hyper-V or WSL 2, virtualization must be enabled. Check the Performance tab on the Task Manager:
If you manually uninstall Hyper-V, WSL 2 or disable virtualization, Docker Desktop cannot start. See Unable to run Docker for Windows on Windows 10 Enterprise.
Hypervisor enabled at Windows startup
If you have completed the steps described above and are still experiencing Docker Desktop startup issues, this could be because the Hypervisor is installed, but not launched during Windows startup. Some tools (such as older versions of Virtual Box) and video game installers disable hypervisor on boot. To reenable it:
- Open an administrative console prompt.
- Run
bcdedit /set hypervisorlaunchtype auto. - Restart Windows.
You can also refer to the Microsoft TechNet article on Code flow guard (CFG) settings.
Windows containers and Windows Server
Docker Desktop is not supported on Windows Server. If you have questions about how to run Windows containers on Windows 10, see Switch between Windows and Linux containers.
A full tutorial is available in docker/labs on Getting Started with Windows Containers.
You can install a native Windows binary which allows you to develop and run Windows containers without Docker Desktop. However, if you install Docker this way, you cannot develop or run Linux containers. If you try to run a Linux container on the native Docker daemon, an error occurs:
C:\Program Files\Docker\docker.exe:
 image operating system "linux" cannot be used on this platform.
 See 'C:\Program Files\Docker\docker.exe run --help'.
Running Docker Desktop in nested virtualization scenarios
Docker Desktop can run inside a Windows 10 VM running on apps like Parallels or VMware Fusion on a Mac provided that the VM is properly configured. However, problems and intermittent failures may still occur due to the way these apps virtualize the hardware. For these reasons, Docker Desktop is not supported in nested virtualization scenarios. It might work in some cases, and not in others.
For best results, we recommend you run Docker Desktop natively on a Windows system (to work with Windows or Linux containers), or on Mac to work with Linux containers.
If you still want to use nested virtualization
-
Make sure nested virtualization support is enabled in VMWare or Parallels. Check the settings in Hardware > CPU & Memory > Advanced Options > Enable nested virtualization (the exact menu sequence might vary slightly).
-
Configure your VM with at least 2 CPUs and sufficient memory to run your workloads.
-
Make sure your system is more or less idle.
-
Make sure your Windows OS is up-to-date. There have been several issues with some insider builds.
-
The processor you have may also be relevant. For example, Westmere based Mac Pros have some additional hardware virtualization features over Nehalem based Mac Pros and so do newer generations of Intel processors.
Typical failures we see with nested virtualization
-
Slow boot time of the Linux VM. If you look in the logs and find some entries prefixed with
Moby. On real hardware, it takes 5-10 seconds to boot the Linux VM; roughly the time between theConnectedlog entry and the* Starting Docker ... [ ok ]log entry. If you boot the Linux VM inside a Windows VM, this may take considerably longer. We have a timeout of 60s or so. If the VM hasn’t started by that time, we retry. If the retry fails we print an error. You can sometimes work around this by providing more resources to the Windows VM. -
Sometimes the VM fails to boot when Linux tries to calibrate the time stamp counter (TSC). This process is quite timing sensitive and may fail when executed inside a VM which itself runs inside a VM. CPU utilization is also likely to be higher.
-
Ensure “PMU Virtualization” is turned off in Parallels on Macs. Check the settings in Hardware > CPU & Memory > Advanced Settings > PMU Virtualization.
Networking issues
IPv6 is not (yet) supported on Docker Desktop.
Workarounds
Reboot
Restart your PC to stop / discard any vestige of the daemon running from the previously installed version.
Unset DOCKER_HOST
The DOCKER_HOST environmental variable does not need to be set. If you use
bash, use the command unset ${!DOCKER_*} to unset it. For other shells,
consult the shell’s documentation.
Make sure Docker is running for webserver examples
For the hello-world-nginx example and others, Docker Desktop must be
running to get to the webserver on http://localhost/. Make sure that the
Docker whale is showing in the menu bar, and that you run the Docker commands in
a shell that is connected to the Docker Desktop Engine. Otherwise, you might start the webserver container but get a “web page
not available” error when you go to docker.
How to solve port already allocated errors
If you see errors like Bind for 0.0.0.0:8080 failed: port is already allocated
or listen tcp:0.0.0.0:8080: bind: address is already in use ...
These errors are often caused by some other software on Windows using those
ports. To discover the identity of this software, either use the resmon.exe
GUI and click “Network” and then “Listening Ports” or in a Powershell use
netstat -aon | find /i "listening " to discover the PID of the process
currently using the port (the PID is the number in the rightmost column). Decide
whether to shut the other process down, or to use a different port in your
docker app.
Docker Desktop fails to start when anti-virus software is installed
Some anti-virus software may be incompatible with Hyper-V and Microsoft Windows 10 builds. The conflict typically occurs after a Windows update and manifests as an error response from the Docker daemon and a Docker Desktop start failure.
For a temporary workaround, uninstall the anti-virus software, or explore other workarounds suggested on Docker Desktop forums.
Support
Docker Desktop offers support for developers subscribed to a Pro or a Team plan. Click here to upgrade your existing account.
This section contains instructions on how to get support, and covers the scope of Docker Desktop support.
How do I get Docker Desktop support?
If you have subscribed to a Pro and Team account, please raise a ticket through Docker Desktop support.
Docker Community users can get support through our Github repos for-win and for-mac, where we respond on a best-effort basis.
What support can I get?
If you are a Pro or a Team user, you can request for support on the following types of issues:
- Desktop upgrade issues
- Desktop installation issues
- Enabling virtualization in BIOS
- Enabling Windows features
- Installation crashes
- Failure to launch Docker Desktop on first run
- Usage issues
- Crash closing software
- Docker Desktop not behaving as expected
- Configuration issues
- Basic product ‘how to’ questions such as ‘how to work efficiently on WSL 2’
What is not supported?
Docker Desktop excludes support for the following types of issues:
- Use on or in conjunction with hardware or software other than that specified in the applicable documentation
- Running on unsupported operating systems, including beta/preview versions of operating systems
- Support for the Docker engine, Docker CLI, or other bundled Linux components
- Support for Kubernetes
- Features labeled as experimental
- System/Server administration activities
- Supporting Desktop as a production runtime
- Scale deployment/multi-machine installation of Desktop
- Routine product maintenance (data backup, cleaning disk space and configuring log rotation)
- Third-party applications not provided by Docker
- Altered or modified Docker software
- Defects in the Docker software due to hardware malfunction, abuse, or improper use
- Any version of the Docker software other than the latest version
- Reimbursing and expenses spent for third-party services not provided by Docker
- Docker Support excludes training, customization, and integration
What versions are supported?
We currently only offer support for the latest version of Docker Desktop. If you are running an older version, you may be asked to upgrade before we investigate your support request.
How many machines can I get support for Docker Desktop on?
As a Pro user you can get support for Docker Desktop on a single machine. As a Team, you can get support for Docker Desktop for the number of machines equal to the number of seats as part of your plan.
What OS’s are supported?
Docker Desktop is available for Mac and Windows. The supported version information can be found on the following pages:
Can I run Docker Desktop on Virtualized hardware?
No, currently this is unsupported and against the terms of use.
windows, troubleshooting, logs, issues